1 Hector简介
Hector是2011年开源的二维激光SLAM的项目,非常创新地使用scan-to-map的匹配方式.
首先其论文提出了如何对离散的栅格地图求导,然后说明了如何使用 高斯牛顿法 进行 scan-to-map 的计算.并且使用了多分辨率地图使计算结果更加准确.
hector的wiki主页为 http://wiki.ros.org/hector_mapping?distro=noetic
github上有人对hector的源码进行了注释,其地址为 https://github.com/tu-darmstadt-ros-pkg/hector_slam
2 代码实现
2.1 获取代码
代码已经提交在github上了,如果不知道github的地址的朋友, 请在我的公众号: 从零开始搭激光SLAM 中回复 开源地址 获得。
推荐使用 git clone 的方式进行下载, 因为代码是正处于更新状态的, git clone 下载的代码可以使用 git pull 很方便地进行更新.
本篇文章对应的代码为 Creating-2D-laser-slam-from-scratch/lesson4/src/hector_mapping/ 与 Creating-2D-laser-slam-from-scratch/lesson4/include/hector_mapping/
2.2 回调函数
接下来的代码 位于 Creating-2D-laser-slam-from-scratch/lesson4/src/hector_mapping/hector_mapping.cc
激光的回调函数里有4个步骤
- 对hector_map_进行初始化与内存空间分配
- 将雷达的数据类型转成hector需要的格式
- 将雷达的数据类型写成hector的地图
- 将hector的地图转换成ros中的地图格式并发布出去
这里的hector_map_每次都是重新进行初始化与析构,这也就导致了地图只是这一帧雷达数据的地图,不会与之前的雷达数据相关联.
可以将这里的new delete两行注释掉,然后将构造函数中对hector_map_进行初始化的语句解除注释.
这样的效果就是始终维护一个地图了,这个将在后续进行实验.
`// 回调函数
void HectorMapping::ScanCallback(const sensor_msgs::LaserScan &scan)
{
    if (!got_first_scan_)       // 如果是第一次接收scan
    {
        got_first_scan_ = true; // 改变第一帧的标志位
        map_frame_ = scan.header.frame_id;
    }

    // 0 初始化与申请内存空间
    // 当雷达数据到来时新建地图
    hector_map_ = new hectorslam::GridMap(resolution_, map_size_, offset_);

    // 1 将雷达的数据类型转成hector需要的格式
    ROSLaserScanToDataContainer(scan, laserScan_container_, resolution_);

    // 2 将雷达的数据类型写成hector的地图
    ComputeMap();

    // 3 将hector的地图转换成ros中的地图格式并发布出去
    PublishMap();

    // 4 析构与释放内存空间
    delete hector_map_;
}`
2.3 ComputeMap()
调用 updateByScanJustOnce() 进行hector地图的生成
`// 将雷达数据写成hector的地图
void HectorMapping::ComputeMap()
{
    Eigen::Vector3f robotPoseWorld(0, 0, 0);
    hector_map_mutex_.lock();
    hector_map_->updateByScanJustOnce(laserScan_container_, robotPoseWorld);
    hector_map_mutex_.unlock();
}`
2.4 PublishMap()
将hector格式的地图转换成ROS格式的地图.
这里的循环有个技巧,就是先用 memset() 函数将所有值设置为 -1 ,这样就可以只考虑 占用与空闲两种情况了.
这里的格式转换比上篇文章中的格式转换 快很多,不知道是不是上篇文章中在for循环内部声明变量的问题.
`// 将hector的地图转成ROS格式的地图并发布出去
void HectorMapping::PublishMap()
{
    int sizeX = hector_map_->getSizeX();
    int sizeY = hector_map_->getSizeY();
    int size = sizeX * sizeY;

    std::vector<int8_t> &data = map_.data;

    //std::vector contents are guaranteed to be contiguous, use memset to set all to unknown to save time in loop
    memset(&data[0], -1, sizeof(int8_t) * size);

    ros_map_mutex_.lock();

    for (int i = 0; i < size; ++i)
    {
        if (hector_map_->isFree(i))
        {
            data[i] = 0;
        }
        else if (hector_map_->isOccupied(i))
        {
            data[i] = 100;
        }
    }

    ros_map_mutex_.unlock();

    // 添加当前的时间戳
    map_.header.stamp = ros::Time::now();
    map_.header.frame_id = map_frame_;

    // 发布map和map_metadata
    map_publisher_.publish(map_);
    map_publisher_metadata_.publish(map_.info);
}`
2.5 进行bresemham画线
接下来的代码 位于 Creating-2D-laser-slam-from-scratch/lesson4/include/lesson4/hector_mapping/map/OccGridMapBase.h
2.5.1 updateByScanJustOnce()
这段函数首先计算了画线的起始点的坐标索引.
我人为的将起始点坐标设置成了(800, 800), 这样就使得生成的地图始终是固定的了.
之后,进行雷达数据的遍历,求得每个雷达点对应的栅格地图的坐标,作为终点,在起点与终点间进行bresemham画线.
`void updateByScanJustOnce(const DataContainer &dataContainer, const Eigen::Vector3f &robotPoseWorld)
    {
        currMarkFreeIndex = currUpdateIndex + 1;
        currMarkOccIndex = currUpdateIndex + 2;

        //Get pose in map coordinates from pose in world coordinates
        // Eigen::Vector3f mapPose(this->getMapCoordsPose(robotPoseWorld));
        Eigen::Vector3f mapPose(800, 800, 0);
        //Get a 2D homogenous transform that can be left-multiplied to a robot coordinates vector to get world coordinates of that vector
        Eigen::Affine2f poseTransform((Eigen::Translation2f(
                                           mapPose[0], mapPose[1]) *
                                       Eigen::Rotation2Df(mapPose[2])));

        //Get start point of all laser beams in map coordinates (same for alle beams, stored in robot coords in dataContainer)
        Eigen::Vector2f scanBeginMapf(poseTransform * dataContainer.getOrigo());

        //Get integer vector of laser beams start point
        Eigen::Vector2i scanBeginMapi(scanBeginMapf[0] + 0.5f, scanBeginMapf[1] + 0.5f);

        //Get number of valid beams in current scan
        int numValidElems = dataContainer.getSize();

        //Iterate over all valid laser beams
        for (int i = 0; i < numValidElems; ++i)
        {
            //Get integer map coordinates of current beam endpoint
            Eigen::Vector2i scanEndMapi;
            scanEndMapi[0] = scanBeginMapi[0] + (int)round(dataContainer.getVecEntry(i)[0] / 0.05);
            scanEndMapi[1] = scanBeginMapi[1] + (int)round(dataContainer.getVecEntry(i)[1] / 0.05);

            //Update map using a bresenham variant for drawing a line from beam start to beam endpoint in map coordinates
            if (scanBeginMapi != scanEndMapi)
            {
                updateLineBresenhami(scanBeginMapi, scanEndMapi);
            }
        }

        //Tell the map that it has been updated
        this->setUpdated();

        //Increase update index (used for updating grid cells only once per incoming scan)
        currUpdateIndex += 3;
    }`
2.5.2 updateLineBresenhami()
这段函数首先验证起始点与终止点的坐标是否合法,如果不合法就跳过.
在正常的SLAM算法中,如果发现有雷达点超过了当前地图的边界,那就应该对地图的尺寸进行扩张,以包含新的雷达点,这一块后续的文章会有讲到.
之后,根据横纵坐标的大小,选定一个主方向,然后调用 bresenham2D() 进行 空闲值 的设置.
对终点额外使用 bresenhamCellOcc() 进行 占用值 的设置.
`// 设置画线的起点与终点
    inline void updateLineBresenhami(const Eigen::Vector2i &beginMap, const Eigen::Vector2i &endMap, unsigned int max_length = UINT_MAX)
    {
        int x0 = beginMap[0];
        int y0 = beginMap[1];

        //check if beam start point is inside map, cancel update if this is not the case
        if ((x0 < 0) || (x0 >= this->getSizeX()) || (y0 < 0) || (y0 >= this->getSizeY()))
        {
            return;
        }

        int x1 = endMap[0];
        int y1 = endMap[1];

        //check if beam end point is inside map, cancel update if this is not the case
        if ((x1 < 0) || (x1 >= this->getSizeX()) || (y1 < 0) || (y1 >= this->getSizeY()))
        {
            return;
        }

        int dx = x1 - x0;
        int dy = y1 - y0;

        unsigned int abs_dx = abs(dx);
        unsigned int abs_dy = abs(dy);

        int offset_dx = util::sign(dx);
        int offset_dy = util::sign(dy) * this->sizeX;

        unsigned int startOffset = beginMap.y() * this->sizeX + beginMap.x();

        //if x is dominant
        if (abs_dx >= abs_dy)
        {
            int error_y = abs_dx / 2;
            bresenham2D(abs_dx, abs_dy, error_y, offset_dx, offset_dy, startOffset);
        }
        else
        {
            //otherwise y is dominant
            int error_x = abs_dy / 2;
            bresenham2D(abs_dy, abs_dx, error_x, offset_dy, offset_dx, startOffset);
        }

        // 将终点单独拿出来,设置占用
        unsigned int endOffset = endMap.y() * this->sizeX + endMap.x();
        this->bresenhamCellOcc(endOffset);
    }`
2.5.3 bresenham2D()
这一块就是 bresenham算法的实现,与上篇文章中的代码差不多,这里不再进行说明.
`// 进行bresenham画线
    inline void bresenham2D(unsigned int abs_da, unsigned int abs_db, int error_b,
                            int offset_a, int offset_b,
                            unsigned int offset)
    {
        // https://www.jianshu.com/p/d63bf63a0e28

        // 先把起点格子设置成free
        this->bresenhamCellFree(offset);

        unsigned int end = abs_da - 1;

        for (unsigned int i = 0; i < end; ++i)
        {
            offset += offset_a;

            // 对应 Sub += dy/dx, 这里的实现是对 左右两边同乘 dx 后的结果
            error_b += abs_db;

            // 判断 Sub > 0
            if ((unsigned int)error_b >= abs_da)
            {
                offset += offset_b;

                // 对应Sub += dy/dx - 1, dy/dx 在之前加过了,所以这里只减 1 ,再左右两边同乘 dx
                error_b -= abs_da;
            }
            // 再将路径上的其他点设置成free
            this->bresenhamCellFree(offset);
        }
    }`
2.5.4 bresenhamCellFree() & bresenhamCellOcc()
分别调用 updateSetFree() 与 updateSetOccupied() 对栅格值进行 空闲与占用 的设置.
`// 更新这个格子为空闲格子,只更新这一个格子
    inline void bresenhamCellFree(unsigned int offset)
    {
        ConcreteCellType &cell(this->getCell(offset));

        // 每一轮画线,每个格子只更新一次free
        if (cell.updateIndex < currMarkFreeIndex)
        {
            concreteGridFunctions.updateSetFree(cell);
            cell.updateIndex = currMarkFreeIndex;
        }
    }

    // 更新这个格子为占用格子,只更新这一个格子
    inline void bresenhamCellOcc(unsigned int offset)
    {
        ConcreteCellType &cell(this->getCell(offset));

        // 每一轮画线,每个格子只更新一次占用
        if (cell.updateIndex < currMarkOccIndex)
        {
            // 如果这个格子被设置成free了,先取消free,再设置占用
            if (cell.updateIndex == currMarkFreeIndex)
            {
                concreteGridFunctions.updateUnsetFree(cell);
            }
            concreteGridFunctions.updateSetOccupied(cell);
            cell.updateIndex = currMarkOccIndex;
        }
    }`
2.6 Hector中的地图数据类型
2.6.1 地图类
代码位于 Creating-2D-laser-slam-from-scratch/lesson4/include/lesson4/hector_mapping/map/GridMapBase.h
可以看到,栅格地图的表示依然是一个一维指针 ConcreteCellType * mapArray.
ConcreteCellType 在这里是模板参数类型,具体实现在下一节进行讲解.
同时,使用 MapDimensionProperties 类保存栅格地图的尺寸信息.
`template <typename ConcreteCellType>
class GridMapBase
{
protected:
    ConcreteCellType *mapArray; ///< Map representation used with plain pointer array.

    float scaleToMap; ///< Scaling factor from world to map.

    Eigen::Affine2f worldTmap;   ///< Homogenous 2D transform from map to world coordinates.
    Eigen::Affine3f worldTmap3D; ///< Homogenous 3D transform from map to world coordinates.
    Eigen::Affine2f mapTworld;   ///< Homogenous 2D transform from world to map coordinates.

    MapDimensionProperties mapDimensionProperties;
    int sizeX;

private:
    int lastUpdateIndex;`
2.6.2 地图占用值更新的实现
上一篇文章中,GMapping是通过 击中次数与观测次数 的比值作为栅格地图中每个格子的值.
这篇文章展示了一种更方便的表示方式.
代码位于 Creating-2D-laser-slam-from-scratch/lesson4/include/lesson4/hector_mapping/map/GridMapLogOdds.h
`/**
 * Provides functions related to a log odds of occupancy probability respresentation for cells in a occupancy grid map.
 */
class GridMapLogOddsFunctions
{
public:
    /**
   * Constructor, sets parameters like free and occupied log odds ratios.
   */
    GridMapLogOddsFunctions()
    {
        this->setUpdateFreeFactor(0.4f);
        this->setUpdateOccupiedFactor(0.6f);
    }

    /**
   * Update cell as occupied
   * @param cell The cell.
   */
    void updateSetOccupied(LogOddsCell &cell) const
    {
        if (cell.logOddsVal < 50.0f)
        {
            cell.logOddsVal += logOddsOccupied;
        }
    }

    /**
   * Update cell as free
   * @param cell The cell.
   */
    void updateSetFree(LogOddsCell &cell) const
    {

        cell.logOddsVal += logOddsFree;
    }

    void updateUnsetFree(LogOddsCell &cell) const
    {
        cell.logOddsVal -= logOddsFree;
    }

    /**
   * Get the probability value represented by the grid cell.
   * @param cell The cell.
   * @return The probability
   */
    float getGridProbability(const LogOddsCell &cell) const
    {
        float odds = exp(cell.logOddsVal);
        return odds / (odds + 1.0f);
    }

    void setUpdateFreeFactor(float factor)
    {
        logOddsFree = probToLogOdds(factor);
    }

    void setUpdateOccupiedFactor(float factor)
    {
        logOddsOccupied = probToLogOdds(factor);
    }

protected:
    float probToLogOdds(float prob)
    {
        float odds = prob / (1.0f - prob);
        return log(odds);
    }

    float logOddsOccupied; /// < The log odds representation of probability used for updating cells as occupied
    float logOddsFree;     /// < The log odds representation of probability used for updating cells as free
};`
栅格地图中每个格子存储的值 表示这个格子是障碍物的概率.但是将这个概率值 通过 probToLogOdds() 函数进行变换了,转换后的形式在更新数值方面更加方便,只需要进行加法就行了.
鉴于有更好的文章对这块进行了讲解,我就不再进行详细说明了,推荐阅读https://zhuanlan.zhihu.com/p/21738718
接下来,举个例子说明一下栅格地图的占用值更新的方式.
例如:
上述代码里将 更新占用值的因子 设置为0.6,将 更新空闲值的因子 设置为0.4, 分别使用 probToLogOdds() 函数进行转换之后得到:
占用值更新量 logOddsOccupied = 0.405465 空闲值更新量 logOddsFree = -0.405465 最后这两个值一正一负.
如果是更新占用,就将这个格子的值加上 logOddsOccupied , 也就是加上 0.405465 ; 如果是更新空闲,就将这个格子的值加上 logOddsFree,也就是减去 -0.405465;
最后通过累加后的值 是否大于零 来决定是否作为障碍物.如果大于零,就当做是障碍物,设置成 黑色格子,如果小于零,就当做是可通过区域,设置成 白色格子.
这样就完成了每个栅格值的累加与更新.
上述代码将 占用值更新量 与 空闲值更新量 设置为数值上大小相等,这样导致的结果就是,格子已经更新成占用了,仅通过一次更新空闲就可以将格子的状态从 占用 转变下去.
实际中,也可以将这两个值设置成大小不一样的,这样在生成地图的时候就会有偏重,可以更容易生成空闲或更容易生成障碍物.
注意
可能有同学不清楚为什么设置一遍栅格状态之后还要更新栅格的值.
这是因为,不管是什么传感器,不管是什么算法,都是存在误差的.
这就导致了不能通过一次两次的更新之后的值,来代表这个栅格是占用还是空闲的,因为这个状态十分有可能是错的.
只有通过长时间的累计之后,最后通过这个值是否大于零,来近似地将这个栅格设置为是否是障碍物,这时候依然不能百分百地确定这个栅格是否就是障碍物.因为,有可能是人腿走过留下的痕迹.
所以,这就是那本非常出名的书叫做 <<概率机器人>>,现在的机器人建图与定位算法基本都是与概率相关,只能按照概率最大的值作为最好值,而不是计算出真实值.
3 运行
3.1 运行
本篇文章对应的数据包, 请在我的公众号中回复 lesson1 获得,并将launch中的bag_filename更改成您实际的目录名。
通过如下命令运行本篇文章对应的程序
`roslaunch lesson4 make_hector_map.launch`
3.2 运行结果
3.2.1 生成单次地图
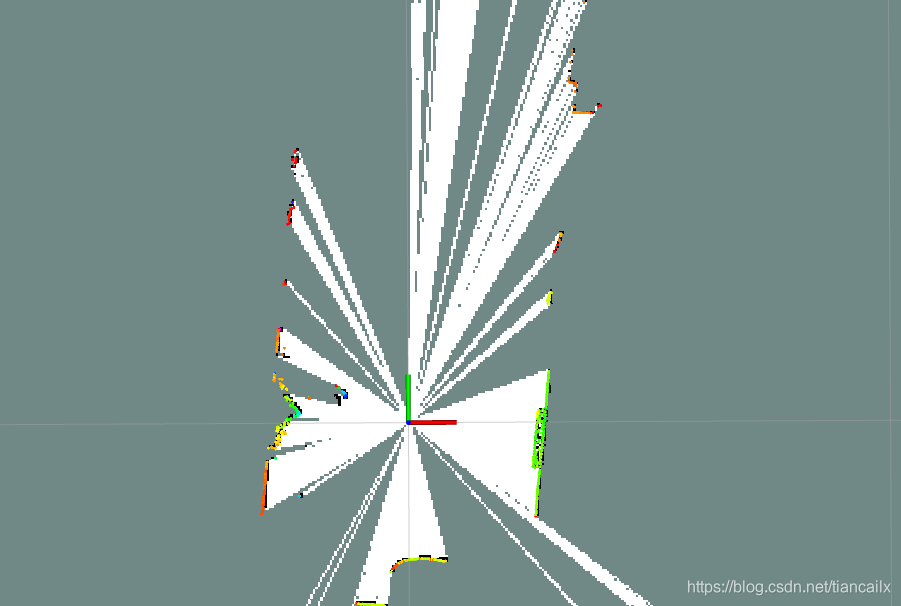
启动之后,会在rviz中显示出如下画面.
地图是不断地根据雷达数据进行更新的,每次生成的地图只是这一帧雷达数据转换后的结果,不会累加之前的雷达数据.
 同时会在终端中打印出如下消息.
`初始化与申请内存空间用时: 0.0303726 秒。
转换数据用时: 0.000160402 秒。
计算hector地图用时: 0.00198889 秒。
转换成ros地图用时: 0.0517925 秒。
析构与释放内存空间用时: 8.089e-06 秒。

初始化与申请内存空间用时: 0.0308826 秒。
转换数据用时: 0.000163696 秒。
计算hector地图用时: 0.00205209 秒。
转换成ros地图用时: 0.0492935 秒。
析构与释放内存空间用时: 7.512e-06 秒。`
大概处理一帧雷达数据生成的地图耗时 0.09s 左右,这对比上篇文章中构建GMapping的耗时 0.4s 已经快很多了.
3.2.2 累加的地图
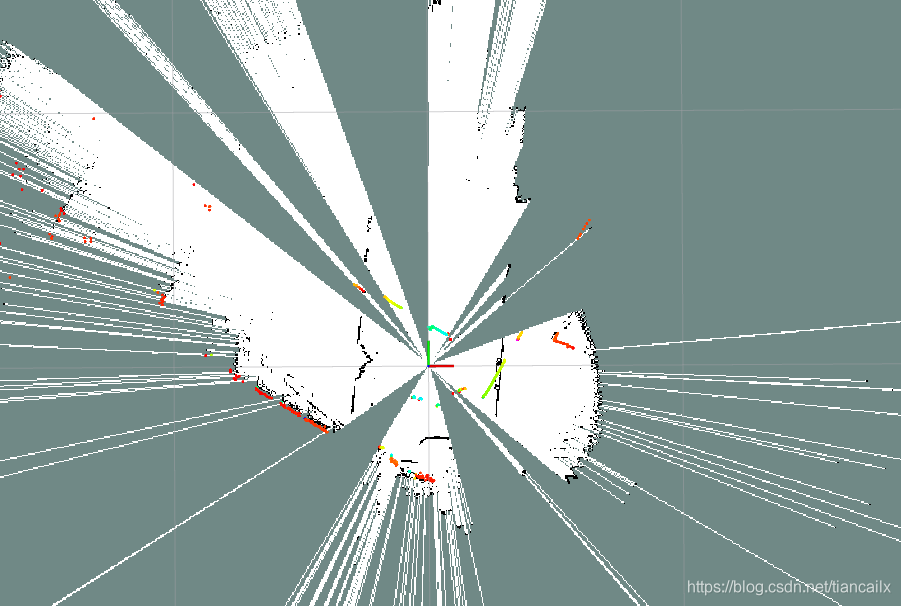
按照 2.2 节所说,将回调函数的 new 与 delete两行注释掉,然后将构造函数中对hector_map_进行初始化的语句解除注释.
这样就是对 hector_map_ 只进行一次初始化,从始至终维持一张地图.
在同一张地图上不断地进行栅格地图的更新.
其结果如下所示,将产生严重的叠图现象.
 终端中打印出如下消息.
`初始化与申请内存空间用时: 2.04e-07 秒。
转换数据用时: 0.000567961 秒。
计算hector地图用时: 0.00381367 秒。
转换成ros地图用时: 0.0547162 秒。
析构与释放内存空间用时: 6.9e-08 秒。

初始化与申请内存空间用时: 1.97e-07 秒。
转换数据用时: 0.000578334 秒。
计算hector地图用时: 0.00362355 秒。
转换成ros地图用时: 0.0509386 秒。
析构与释放内存空间用时: 7.9e-08 秒。`
可以看到,申请内存的时间没有了,程序执行的更快了.
这个实验可以说明SLAM的本质是什么.
就是找到适当的位置(也就是定位),在这个位置上将雷达数据写成栅格地图.如果每次找到的位置都很准确,那就能构建出十分完美的地图.
3.3 结果分析
可以通过如下命令来看下map这个topic的频率
`$ rostopic hz /map /laser_scan
   topic       rate   min_delta   max_delta   std_dev    window
===============================================================
/map          10.12   0.03021     0.1309      0.01243    71
/laser_scan   10.0    0.09056     0.1037      0.002755   71`
可以看到,同样的地图大小,使用hector的方式构建地图,可以达到10hz的频率,而使用gmapping的方式构建地图,只能达到4hz.
4 总结与Next
本篇文章简要地对Hector中的地图构建模块进行了重新实现.
并说明了Hector中的地图格式以及其地图的更新方式,感受到了其计算地图模块更加快速.
下一篇文章将继续基于Hector进行实现,将进行 scan-to-map 的具体实现,并且对其高斯牛顿求解的过程进行说明.
文章将在 公众号: 从零开始搭SLAM 进行同步更新,欢迎大家关注,可以在公众号中添加我的微信,进激光SLAM交流群,大家一起交流SLAM技术。
同时,也希望您将这个公众号推荐给您身边做激光SLAM的人们,大家共同进步。
如果您对我写的文章有什么建议,或者想要看哪方面功能如何实现的,请直接在公众号中回复,我可以收到,并将认真考虑您的建议。